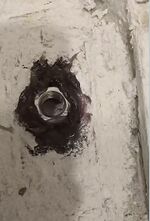
Epoxy for Bathroom Bolt Replacement
This is a story about trying to replace floor bolts on a rear exit toilet. The first attempt was to use epoxy to put new bolts into a preexisting tiled bathroom floor. The epoxy approach ended up not turning out properly (due to user error), and instead Polyester Resin based Hull and Deck Putty attached to a piece of mild steel and a stainless nut was used instead as an adhesive. Then this also failed, and instead of using any kind of resin here (which was too difficult to adhere to the stainless), simple welding and concrete screws were used. While all of these approaches could potentially work if done properly, the easiest thing was to weld and use concrete screws.
The epoxy approach was not taken seriously enough, the bolts were not put deep enough into the floor, and the measurements were incorrect, the polyester approach was flawed due to differences in bonding between mild steel (which adhered well to the putty) and improperly prepared stainless (which did not stick to the putty). The final approach turned out to be the right answer here. Note that we actually sell a resin designed to work with concrete anchors, but I didn't use that here. That will have to wait for another day. Concrete screws are good enough for an indoor residential toilet.
Overview
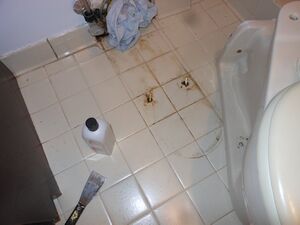
The toilet has four bolts. Two on the back, and two on the bottom. It is a toilet which exits out the back (a rear outlet toilet). The two bottom bolts have rusted out over time. The two back bolts are still intact. The goal will be to somehow replace the floor bolts. This project did not turn out correctly the first time, so there will be two approaches documented here.
Concerns:
- The old bolts will be rusted, only until they go into the floor, at which point they will be solid bolts.
- Replacement of the tile/subfloor is not practical. We just want to change out the bolts.
- The new bolts must be set in epoxy/glue/adhesive strong enough to keep the toilet from moving.
Approach One: Epoxy bolts into the floor
Items needed
- Two Part Epoxy (Part A is base resin. Part B is hardener)
- Acetone (cleanup)
- Brass/Stainless nuts and bolts of appropriate length
- Washers
- Basic tools for removal of toilet (various wrenches, screwdriver, socket set).
Removal of toilet
The removal of the toilet here is relatively easy. It required a flat head screwdriver (for tank bolts) and a ratchet set to hold the bolt stead. There are also the drain bolts which require pliers or a wrench. The trickier part is putting it back together, without a leak. Certain parts of the toilet are prone to leaking, so a wax ring (I've been told these are made of beeswax) is used, and some wax put on any seals that may leak (the bolts that hold the top tank as well as the center top tank outlet are coated with some wax).
Preparation
Items required were purchased from the hardware store. This job required at least:
- Brass bolts
- Brass nuts
- stainless or brass washers
- Two Part Epoxy
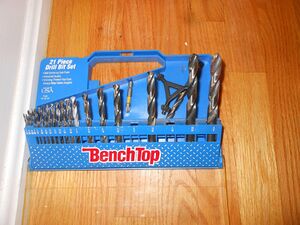
And you should have some basic tools, including a hand drill, and drill bits. The plan will be to drill a hole into the ceramic tile, fill the hole with epoxy, let cure, then do at least one more layer of epoxy after the first.
Buy different lengths of bolts. I bought 1.5" and 2". I ended up using the 2". What length to use will depend upon your floor. Also measure the toilet tank bolt hole diameter, and do not buy a bolt bigger than what will fit through the toilet!
Drilling into Tile
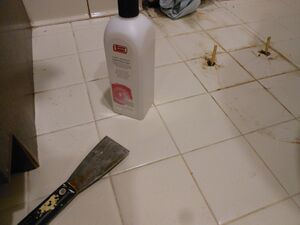
Drilling into tile seemed easy. The old bolts were still in the tile. I did not remove those, but drilled adjacent to them. Ideally I would've drilled through the old bolts (which were only rusted on top) but this proved too difficult without a drill press to stabilize. I ended up angling the bolts slightly, and tested a fit beforehand to confirm that it would work, by placing the toilet over the bolts which were blue taped into position.
Epoxy Layering
After placing the bolts, and mixing / pouring the two part epoxy, I used blue tape to hold the bolts in proper position. After at least 12 hours (I waited overnight) the bolts were checked, confirmed to be firm and then I gambled. I poured the next layer of mixed epoxy onto the base of the bolts, and then placed the toilet back on, while the bolts were still curing. I do not recommend this, but due to time constraints, I wanted to get the toilet back into working order.
By carefully placing the toilet, as to not break the first epoxy bond, I was then ready to re-assemble the toilet, and let the 2nd layer of epoxy fully cure. I waited again, overnight.
It should be noted that when placing the first layer of epoxy in the tile, and its subfloor (likely hardy board), that much of the first layer soaked into the subfloor. This was another reason for the 2nd coat. I wanted to ensure the bolts did not come loose. They were cured into the tile, but the left bolt was less so than the right. A 2nd layer, ensured the epoxy was set.
How Thick Can the Epoxy Be Layered?
I know from my experiments with silicone molds - not too thick. The epoxy we sell is not for making 3"x3"x3" cubes, it's for using as a protective layer for floors or similar such usage. Maybe 8mm thick is a good place to stay under.
Cleanup
Let me emphasize the necessity of acetone for cleanup.
Upon pouring the first layer, there was some overspill from the epoxy, as it settled into the tile/subfloor. This epoxy if not cured, would've put some millimeters on the tile, and possibly upset the toilet from sitting flat. Acetone is the best way to clean 'uncured' epoxy in this situation. It will clean up neatly, and can be purchased from Advance Coatings (better quality) or from Grocery Stores (low quality). See Acetone, for more details.
Reassembly of toilet
attachment of washer + nut
tighten 'handtight', then finish with a few turns (not too many) with wrench.
cleanup
job complete
Approach One Conclusion: 12/2020
The epoxy bolts weren't placed appropriately, (bad measurement) they were angled slightly, and also due to not drilling deep enough the bolts were not held strongly enough into the floor. So this approach did not pan out in the end.
What would a plumber do?
I asked the opinion of a plumber on how to replace these, and he said they would simply drill down into the concrete with longer bolts, from the top of the toilet after installing. I then asked him, what would they do when the toilet needed to be removed, and he said drill even deeper bolts after replacing it. Of course, that can't go on forever, so at some point, you end up through the floor. (This is a limitation of my residence, and not of necessarily all homes). The plumbers are busy men, and they don't have time to make a project out of the bolt replacement, so sometimes their solutions are rushed more than someone with enough time to experiment can do. So let's return back to this problem in 2023.
Approach Two: 2023 Polyester Putty and Mild Steel
The toilet has been mostly ok for the past couple years, but it is not as solid as it should be without floor bolts. I delayed this project for a long time, because I wasn't sure just how I could properly do this, without a repeat of the first approach. I got into welding, and starting buying mild steel (which I will refer to as soft steel for the remainder of this document) at the local metal supermarket, when I realized a more robust solution.
Plan
Instead of trying to set bolts in the floor, I would somehow set a nut below the toilet, and then use threaded rod to thread into the nut from above (with the toilet already placed), finally placing a nut on top of the rod to hold the toilet in place. This way I don't have to worry about placement of the toilet bolt without the toilet in place. I can place the nut, adjust it so there is a good fit to the toilet bolt holes, and then set everything in place. (This is a limitation of rear outlet toilets, as you have to set the floor bolts AND the back bolts properly. Where as a normal toilet, you only have to set two bolts. With four bolts there is less margin for error).
To go into details on this approach: I would put a nut on a piece of soft steel with adhesive (in this case I used Polyester Resin putty, although epoxy probably could've been used). and then the soft steel would be held in the tile with some premixed grout (I considered using Putty, but it doesn't bond to ceramic, so grout was a better choice). Any reasonably multi purpose bathroom concrete / tile mix would probably work. Sanded (not non-sanded) grout, should be used.
With a nut securely held below the toilet, you can cut a piece of threaded rod (stainless) and then fit it after the toilet has been placed, putting another nut on top of it, to hold it in place.
Using threaded rod, instead of bolts was a better solution, as the threaded rod can be cut to size.
Items Needed
- Proper eye, ear, and face protection (ideally a welding helmet)
- Angle grinder or bandsaw
- Stainless threaded rod
- Stainless nut
- Adhesive (Polyester Hull and Deck Putty was used here)
- Sanded grout
- Soft (mild) steel bar cut to size
- File or someway to scratch the steel and nut.
Steps
- Drill out a part of the soft steel so there is a place for the nut to sit. This is optional, and depends how much space you have below the toilet.
- Mix a small paper cup of putty with some MEKP catalyst.
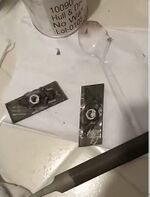
- Use putty to hold the nut on the soft steel. Make sure not to get any putty on the threads of the nut, or where the threaded rod has to go. However the putty should be over the top of the nut, not just on the sides. If you only put putty on the sides, and it doesn't adhere to the hard stainless, the nut may be able to be pulled upwards.
- Wait until the putty cures. It should be placed slightly over the top of the nut, but not over the threads. See the pictures.
- Cut threaded rod to an appropriate size for a floor bolt. How long will depend on how low the soft steel and nut will be below the toilet. Because the threaded rod is threaded on, 'after', the toilet is in place, it can be longer than a standard floor bolt.
- Mark off a square where you will remove the tile. It should be sized slightly larger than the piece of soft steel.
- Use an angle grinder, and ideally an abrasive diamond blade (although in a pinch, a standard metal cut off wheel will work. Wear proper protection.) and cut the lines you marked off previously
- Use a hammer and or some type of chisel (A screw driver will work in a pinch) to remove the tile within the square you cut in the previous step. This step will have a lot of flying ceramic pieces, so make sure your glasses are on properly.
- Some measurement of the toilet, and where the bolts will go is now in order. You should be able to place the soft steel w/nut under the toilet, and review that the threaded rod will fit before curing it in place with grout. Use a marker to assist in placement by making lines that intersect where the nut will go.
- Once you are confident the measurements are correct, grout the steel into the floor with the nut.
- Wait for the grout to cure (12-24 hours)
- Place the toilet.
- Put the threaded rod in the floor nuts.
- Put a washer and nut on the threaded rod.
Notes
Always place a nut on the threaded rod before cutting it, so you can get the threads properly grooved out after it's cut. Otherwise you will have to use a tap and die set to regroove where it's cut.
Stainless Steel bar could be used, but it's much harder to cut. You will need carbide or proper bits. There are drill bit charts such as the MSC catalog, which show what metals need what type of drill bit.
The putty adheres well to solid steel, but not as much to the stainless (I may have not scratched the stainless nut enough). So in this case, we will make sure to put the putty over the top of the nut to hold it in place.
One advantage of the putty is that it cures faster. Where as you could use grout for everything here, it will take a bit longer for the grout to properly cure. The putty will cure a bit faster than that (I can't speak for full strength, however). Curing speed of the putty will depend on amount of catalyst used, though I try to use less, rather than more.
End Result
The putty adhered well to the soft steel, but did not adhere as well to the stainless. This may have been due to me not preparing the stainless surface properly. Because it is so hard, you may need to take extra care to scratch off the outside layer. As a result, one of the pieces of steel had the nut fall out and the putty did not hold it in properly. Instead I went with the third and final approach. Third times the charm.
Best Approach: Steel bar, Concrete screws, and Welding
- Take a piece of mild steel bar (stainless would be better if you have carbide bits)
- Drill holes in the mild steel around the center, where you will later use concrete screws to hold the steel in the concrete subfloor. A drill press works best.
- Remove the toilet, put it aside.
- Break up the tiles underneath the toilet with a hammer / screwdriver, or angle grinder, or whatever chisel type tools you have available. You want to make rectangles just slightly bigger than the steel bar.
- Position the steel bar under the toilet in the holes prepared.
- Use concrete screws and get it solidly adhered to the floor (you will need an appropriate masonry bit to drill preholes, but any drill should work, you don't necessarily need a concrete / hammer drill. A normal drill is ok. Get extra masonry bits as they break easy (this kind of work should have coolant on the bit, but that's impractical here)). I use 3/16 drill bits and 1/4 concrete screws. The tapcon ones sell separate drill bits, and I've found that the socket tapcon screws are much better than the philips head type. You may need a socket set or a wrench.
- Put the bottom half of the toilet back (make sure it is making a tight seal with the floor or wall flange, if this is a rear exit toilet) and mark with a sharpie where the Toilet holes will go on the soft steel. There should besome space so that the nut or any of the screws won't cause the toilet to stick up from the floor.
- Weld a stainless nut just over the sharpie mark. (protect it from weld spatter)
- Put the toilet back. Make sure it is flush with the floor.
- Thread a cut piece of stainless rod in the toilet hole and into the nut.
- Put another nut w/washer on the rod.
That is the best approach. There is no need to use putty or epoxy. It's best to weld the nut after the toilet is placed, to make placement easier. Otherwise you may have some headache trying to adjust where the hole will line up with the toilet. A quick internet search says that toilet floor bolts are not standardized. A flux core welder can be rented from hardware stores if necessary.
I suppose epoxy or resin could be used to hold bolts, but I found that putting a nut below the toilet, and then using threaded rod to go through the toilet bolt hole to the nut below was more modular. For a bottom exit toilet, it may not matter, but for a rear entry toilet, the placement of 4 bolts (instead of just 2) is more difficult, so this is what works for me.
