Difference between revisions of "Gelcoat Anchoring"
(→Todo) |
|||
| (2 intermediate revisions by the same user not shown) | |||
| Line 40: | Line 40: | ||
Overall, this was a good use of old resin, but without thickener, the resin runs out the syringe and down the wall. It's still a fun project to take up, and it shows that syringes can be used for resin as well as for catalyst. Here, you are 'injecting' resin into the wall, and then placing a bolt in. It makes me wonder if there is any advantage to having resin filled concrete blocks (it looks like online, that concrete is sometimes used to fill blocks, though you could use other materials such as resin (if non flammable)). | Overall, this was a good use of old resin, but without thickener, the resin runs out the syringe and down the wall. It's still a fun project to take up, and it shows that syringes can be used for resin as well as for catalyst. Here, you are 'injecting' resin into the wall, and then placing a bolt in. It makes me wonder if there is any advantage to having resin filled concrete blocks (it looks like online, that concrete is sometimes used to fill blocks, though you could use other materials such as resin (if non flammable)). | ||
| − | This project made more of a mess than I expected. I think if you added a thickener, you might have an easier time dealing with the resin. Though it may not be absolutely necessary. Also, you will need dedicated resin syringes (seperate from the catalyst ones) as resin is fairly thick. | + | This project made more of a mess than I expected. I think if you added a thickener, you might have an easier time dealing with the resin. Though it may not be absolutely necessary. Also, you will need dedicated resin syringes (seperate from the catalyst ones) as resin is fairly thick as I mentioned before. |
==Todo== | ==Todo== | ||
| Line 46: | Line 46: | ||
There are videos along with these photos, that I will upload at a later date. | There are videos along with these photos, that I will upload at a later date. | ||
| + | |||
| + | |||
| + | [[Category:Application Notes]] | ||
Latest revision as of 10:26, 27 February 2026
This is a similar usage case to Anchoring_Cement_Application, however, in this case, instead of using a dedicated anchoring product for this, we are simply using excess gelcoat. Polyester resin is a strong enough adhesive for small jobs, and in this scenario, the goal is to get pegboard on a concrete wall. Since this is a low weight, non critical application (i.e. the weight of pegboard with tools is minimal, and this is indoors), we can get away with using any leftover gelcoat or polyester resin.
This is a good use of leftover resin.
Items Needed
- Extra Resin or Gelcoat
- Catalyst
- Mixing Cup
- Popsicle Stick
- Syringe
- Rags
- Acetone
For this type of application, you will want to use a syringe that has an opening large enough to work with the relatively viscous gelcoat or resin. Using Catalyst_Measuring_Syringes might not work, as catalyst is thinner. You may try cutting a thinner syringe near the end with a pair of pliers. For a small job, it should suffice.
For this tutorial, we will assume you have already drilled the necessary holes in the wall. Also, we will assume you have the necessary threaded rod or bolts prepared (in this case, I cut 1/4" bolts with a bandsaw to make them usable).
Steps
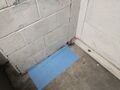
- When working with a syringe and resin, you will find that it tends to spill down the wall. You will make a bit of a mess. Therefore, start by putting some rags down on the floor.
- Note that even with rags, this process will be messy, and likely the wall will get some resin on it. Acetone can be used to cleanup afterwards, but it's not perfect. You wouldn't want to do this on an important wall, without proper prep. That may involve covering off any areas you don't want to get resin on. Or, you might paint over the resin after. For this example, I am not concerned as much with the gelcoat as it is going to be covered up.
- If you are putting bolts on the wall, you probably want to cover them with tape to avoid getting resin in the threads (or you can use a wire wheel afterwards).
- Mix the resin with catalyst in the mixing cup.
- Use the syringe to draw in some of the premixed resin.
- Carefully inject the resin into the void in the wall.
- Place the bolt into the wall and resin.
- Position the bolt properly, if needed.
- Cleanup
Use rags on the floor.
The resin may smear on the wall. Use acetone to clean up or prep by covering the wall.
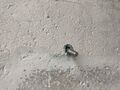
Improper Application of resin will have an air gap.
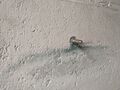
Proper Application of resin from a syringe will bond all areas.


Conclusion
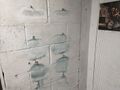
You may notice there is already pegboard on the right side, but that is a different size pegboard than what will be installed.
Overall, this was a good use of old resin, but without thickener, the resin runs out the syringe and down the wall. It's still a fun project to take up, and it shows that syringes can be used for resin as well as for catalyst. Here, you are 'injecting' resin into the wall, and then placing a bolt in. It makes me wonder if there is any advantage to having resin filled concrete blocks (it looks like online, that concrete is sometimes used to fill blocks, though you could use other materials such as resin (if non flammable)).
This project made more of a mess than I expected. I think if you added a thickener, you might have an easier time dealing with the resin. Though it may not be absolutely necessary. Also, you will need dedicated resin syringes (seperate from the catalyst ones) as resin is fairly thick as I mentioned before.
Todo
Some weight bearing tests should be done, out of curiousity.
There are videos along with these photos, that I will upload at a later date.