Epoxy
This article covers Advance Coatings Epoxy Resin, and its properties, pitfalls, and use cases. The base resin is a clear liquid, but can be purchased in colours, or colour-matched.
We currently sell a few different epoxy products, therefore this will be a general page for our epoxy products. While most of this will pertain to all epoxy products, the amounts of Resin to Hardener (whether 5 parts to 1 or 3 parts to 1) may differ.
Common Applications for Epoxy include Coating on top of concrete, plastic, and metal. It is typically a thin layer.
Contact us at <info> <at> advancecoatings.com for an SDS sheet.
Safety
Epoxy (part A) is not flammable by itself, however it is a fire hazard, when mixed with Part B in a large mass (such as in a bucket, or drum) and let to sit. The Hardeners (part B) are also corrosive, and skin contact should be avoided. If skin contact is made, use Acetone or a solvent to clean.
Use Epoxy in a well ventilated area. Some form of breathing protection is recommended. A fan is a good option, to keep vapors moving away from you.
Respirator
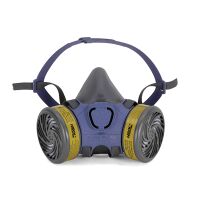
A recommended Respirator would be the Moldex 7000 Series Reusable Half Mask Respirator link: https://www.moldex.com/product/7000-series-half-mask-respirator/ Note that we sell smaller disposable dust masks, not these.
You should purchase a filter for organic vapors such as the Moldex #7300 Organic Vapor/Acid Gas Cartridges For 7000/7800/9000 Series Respirators link: https://www.moldex.com/product/7000-7800-9000-series-respirator-organic-vapor-acid-gas-cartridge/
You don't have to go with Moldex. There are similar products from 3M. Likely any well known name brand will offer adequate protection. I would recommend buying from official distributors for a product like this. It is not worth cutting corners for a proper respirator.
Safety Goggles
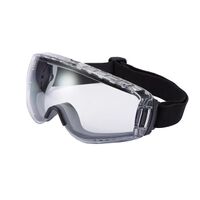
Eyes should be protected from splashing of resin, or any catalyst. You can purchase ANSI Z87 rated safety glasses, but we would highly recommend you instead purchase a pair of safety goggles such as pictured. A good name brand pair of Safety Goggles include a rubber gasket to better seal around the eyes, as well as offering better visibility due to a larger lens, and a tendency to fog up less in cooler weather.
Epoxy and Hardener will smoke/heat up if a moderate to large amount is left in a mixing container
Our Epoxy has a strong exothermic reaction. If you leave it in a container after mixing with the hardener, within 5 minutes or so it will start to react - smoking and heating up. This means that epoxy should be applied immediately after mixing. The larger the batch of epoxy, the more dangerous. You can demonstrate this danger on your own, by mixing a 1/2 cup of epoxy with hardener in a small paper cup. Within a few minutes the cup will be hot to the touch, and may steam. Use caution when testing. It's important to understand this danger, but test in a non-hazardous environment.
Small amounts of reacting epoxy, such as a paper cup can be mixed with water to suppress the reaction, or left outside to react and exhaust its energy.
Note that when it is applied in a thin layer, such as on a floor, there is no fire hazard. It only reacts when it is in a large mass.
Some epoxy and hardener mixtures handle being laid down thicker than others.
Fire Hazard
Warning: This product is Flammable.
Application Overview
First, the epoxy is heated slightly, to thin it out. Then, the desired epoxy & hardener amount is calculated. For a 3:1 mixture (3 parts A to 1 part B), you might have 60ml of epoxy, to 20ml of hardener. Once you are ready for a given area, you can mix the resin and hardener, then apply. Application should be immediately after, to avoid an exothermic reaction. Typically you have about 5-10 minutes, but we recommend applying it immediately, for when it reacts, it will thicken.
Steps
- Warm up Epoxy with a low power heater, let to sit until thin.
- Calculate appropriate proportion of Part A (Epoxy), and Part B (Hardener).
- Plan where you will be applying the epoxy.
- Mix epoxy and hardener thoroughly.
- Apply mixture to surface (without delay, as mixture will react).
These steps are generalized and omit specific details such as cleaning a surface before application. For more detailed guides and actual use cases see Application Notes.
Hardener Tricks
With our epoxy, you can use one base epoxy resin with different hardeners. For example, you might mix the Base Epoxy with our DEH24 hardener, which mixes at a 4:1 (resin to hardener) mixture. With that same epoxy, at a different time you can also use a different DEH hardener which may have a 3:1 or 5:1 ratio, respectively.
So for the same resin, you can try different hardeners to get different results. Some hardeners cure better in thicker layers, others in thin layers. Depending on your requirements you can choose the hardener appropriately.
Items Needed
Tips & Techniques
Heat up the Part A Epoxy Base Resin Before Use
The epoxy works best when heated before mixing. For example, if you have a 5 gallon pail of epoxy, a 5 gallon pail heater can be put on the outside for 10-20 minutes beforehand. The goal is to have the epoxy be liquid, as if like a bottle of water. You want to avoid having the epoxy be thick before application. If the epoxy is thick when you mix it with the hardener, it may mix unevenly, and as a result not all of the epoxy may cure.
- Put low power heater on Epoxy
- Shake occasionally
- When epoxy has a low viscosity (thin like water), it is ready for mixing.
| ||||||||||


